MapleStory Absolab Weapon Guide - Lotus and Damien Prequests
MapleStory Absolab Weapons and Equipment are considered some of the best mid-game gear in the current MapleStory Meta. This gear is usually a stepping-stone until you start to work towards end-game Arcane gear, which if you're playing on a Reboot server, takes thousands of hours to obtain. Since Absolab gear is quite accessible, it's something most players can work towards and obtain relatively easy. Like most MapleStory content, to obtain Absolab Gear you will need to complete prequests and do dailies (now turned to weeklies) in order to get every piece of gear. This guide will walk you through everything you need to know about obtaining Absolab Gear, including completing the prequests, the dailies and star-forcing guide.

Guide Last Updated: 21/02/2020
- Absolab Prequests Guide
- Absolab Equipment Guide
- Lotus Boss Fight Guide
- Damien Boss Fight Guide
- Absolab Coins Weekly Quests Guide
Absolab Gear was released in the Black Heaven update, which came in 2015 and was released in version 160 for MapleStory Global (US Version). Upon release, Absolab gear wasn't considered better than the current meta and so obtaining it was really only something enthusiastic players would try. However, when MapleStory introduced Star Forcing and upped the cap to 25 stars, it suddenly changed the meta to make Absolab gear some of the best in the game.
Anyone who plays in MapleStory Reboot will need to go after Absolab gear. Obtaining the full set of equipment can take up to 11 weeks if you're only doing the weekly quests on one character. However, if you have multiple level 200+ characters, you can obtain all the gear you need in a few weeks. In order to obtain Absolab gear you need to do the following:
- Be level 190+
- Complete the prequests (Black Heaven & Heroes Of Maple)
- Defeat Lotus and Damien Bosses multiple times
- Complete Weekly Quests to help create Absolab Coins
Absolab Prequests Guide
Requirements
Level 120+
Black Heaven Time: 3-4 hours
Heroes Of Maple: 30 minutes
In order to start the prequests for making Absolab gear, you need to be level 120. The content is scaled to your level, so if you do the quests at level 200, the mobs will have a difficulty set to level 200 mobs (but they are generally not a problem). If you're struggling to level, check out our MapleStory EXP Guide and our MapleStory Reboot Training guide.
The prequests are actually really easy to do and somewhat enjoyable. You have to complete both the Black Heaven Storyline and the Heroes Of Maple (only chapter IV) Blockbuster quests to unlock the boss monsters Lotus and Damien. Without completing these prequests, you won't be able to enter the fight at all and you'll need to defeat these bosses to obtain cores and stones to make Absolab gear.
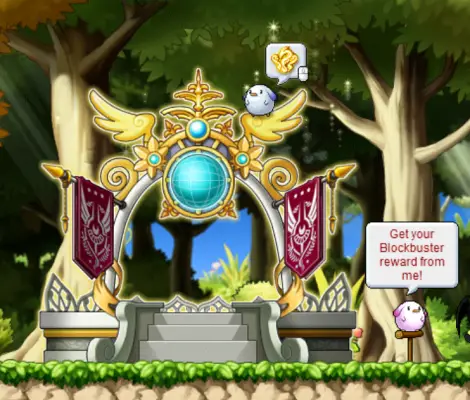
Both "Blockbuster" quests can be completed by clicking on Quick-Move icon and selecting the Dimensional Mirror in any town. Select the Ereve Conference Pavillion and you'll be teleported to Ereve where you can begin the quests. If you go to the far left of the map you'll come across a portal that you can click on, giving you the option to start either Black Heaven or Heroes Of Maple. It doesn't matter which order you do the quests in.

For Black Heaven, there are six acts to complete. You start at Act 1 and work your way through each act, usually lasting around 30 minutes each depending on how quickly you can read the story dialouge (or skip it altogether). Each act will require you to defeat X amount of mobs (a bit like Monster Park), do some simple quests/tasks and generally easy content. There isn't anything really challenging about the Black Heaven content, it's just very time-consuming.
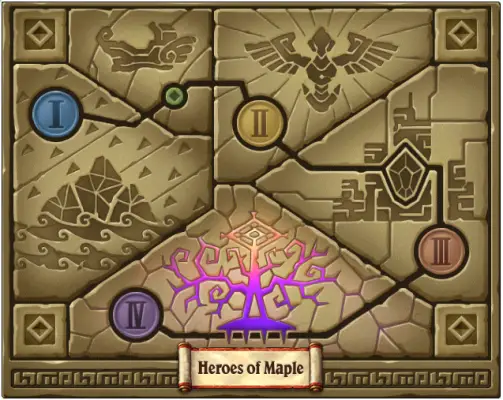
For Heroes Of Maple, you actually only need to complete act IV in order to unlock the boss fight for Damien. If you're interested in the story, feel free to complete all acts, but if you're just looking to get Absolab gear as fast as possible, only act IV needs to be completed (the last act).
Once these acts have been completed (they're really straight-forward and linear), you'll now be able to challenge Lotus and Damien.
You also only need to complete the acts on one character and then the bosses and weekly quests will have been unlocked for all characters on the account.
Absolab Equipment Guide
Absolab Equipment can be gotten from two different coin shops that require Absolab Coins and Stigma Coins. Absolab Coins can be spent in Scrapyard:Heaven map and Stigma Coins can be spent in Dark World Tree: Deserted Camp map. In order to obtain these coins, you have to exchange them for two different items.
Absolab Coins
 1 Extraordinary Energy Core (Grade S) - Obtained from defeating Lotus- can obtain up to a max of 4 per defeat
 20 Diffusion-Line Energy Core (Grade A) - Obtained from doing weekly quests in Scrapyard (12 per week)
Stigma Coins
 1 Twisted Stigma Spirit Stone - Obtained from defeating Damien - can obtain up to a max of 4 per defeat
 20 Faint Stigma Spirit Stone - Obtained from doing weekly quests in Dark World Tree (12 per week)
Each of the two shops that sell Absolab Equipment sell different pieces. In terms of getting the Best In Slot gear, you only want to get the following (ignoring the hat and overall):
Stigma Coin Shop
- Absolab Shoulder (2 Stigma coins)
- Absolab Weapon (5 Stigma Coins)
Absolab Coin Shop
- Absolab Gloves (2 Absolab Coins)
- Absolab Shoes (2 Absolab Coins)
- Absolab Cape (2 Absolab Coins)
- Absolab Weapon (5 Absolab Coins)
Both shops sell the Absolab Weapon for 5 coins. So you can choose which shop to buy your weapon from, although most players will buy from the Stigma Coin Shop since those Weekly quests are a lot easier to complete (less time consuming) than the Scrapyard Weeklies.
In order for you to get all 5 pieces, you will need:
- Extraordinary Energy Core (Grade S) x 6
- Diffusion-Line Energy Core (Grade A) x 120
- Twisted Stigma Spirit Stone x 7
- Faint Stigma Spirit Stone x 140
You can defeat both Lotus and Damien once per week. With them dropping up to a max of 4 Cores/Stones, it'll probably take around 3-4 defeats of these bosses to get enough cores/stones to get all equipment pieces. The Drop Rate is effected by drop rate gear and multipliers, so if you have a Big Spider Familiar (+60% drop rate) or drop rate gear, equip it to maximise your chances of getting cores/stones.
Weekly quests give you 12 grade-a cores or faint stigma spirit stones per week. Luckily, these items are transferable in the account, so you can also complete these weekly quests on multiple characters (level 200 required).
Lotus Boss Fight Guide
Requirements:
Level 190+
Death Count: 5
Lotus has three stages to her boss fight. A party of up to 6 players can enter once every 30 minutes and she can be defeated once per week. There are two modes: Normal Mode and Hard Mode. Hard Mode is for players with End-Game gear who need multiple Absolab gear copies for Star-Forcing (since they can boom equipment). Normal Mode is what we will focus on as it's likely going to be the most viable way for most players to get equipment.
In Reboot Servers, it's very common for players to get "carries" for these bosses. If you're part of a popular guild, high-level members will offer to carry you through the boss, defeating it for you whilst you can pick up the drops (Cores/Stones). This boss is still very tough to beat even in normal mode, so many players who are trying to get Absolab gear often get carried to help speed up progression.
Lotus Stage 1 Fight
HP: 400,000,000,000
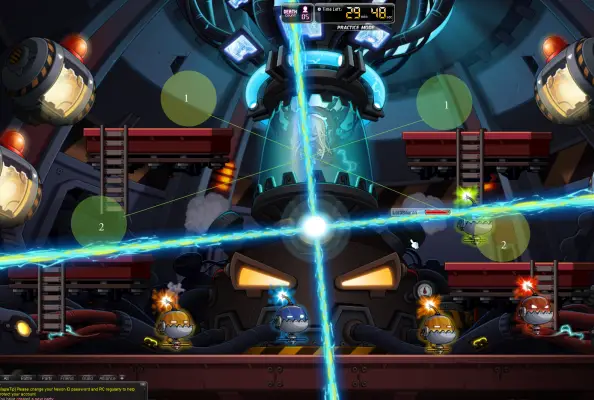
The first stage of the Lotus boss fight requires you to defeat the core she is trapped in. A spinning laser will rotate around the map at different speeds and directions; if you hit it you will instantly be 1-hit KOed. There are also debris dropping all over the map that deal small amounts of % HP damage, which can stun you too. Then you have to watch out for the flying mobs (Bots) that spawn constantly, which can deal different status effects to you if you don't kill them fast enough.
Attacks
- Rotating Laser - 1hit KO
- Falling Debris (% HP damage)
- Flying Mobs - Status Effects (Red Bot: Stun, Green Bot: Reverse Direction, Yellow Bot: Skill-Lock)
Tips
- Dodging the rotating laser is your main concern for this part of the boss fight. It can rotate in either direction and can also speed up/slow down. Whilst you move around the map to avoid the laser, you also need to be doing damage to the core. There are two hidden portals on either side of the map that can teleport you quickly to the other side, which is very helpful when the laser is speeding up.
- When you enter Lotus, the laser will spawn within a couple of seconds. If you're playing on a laggy computer, you can sometimes lose a life instantly upon spawning. Best to lower your graphic settings if you're sturggling with this.
- If you have the Blaster/Resistance link skill, it gives you X amount of seconds of not taking any damage after death, which is great for repositioning yourself if you die in this mode.
Lotus Stage 2 Fight
HP: 400,000,000,000
The second stage of Lotus is a bit more traditional boss fight. There is falling debris that deal % HP damage, as well as some floating orbs that will bounce around the map dealing % damage. Lotus has one ranged mele attack that will knock you back and has a special lightning mode that will one-hit KO you if you don't jump on the safety platforms when the attack happens.
Attacks
- Falling Debris (% HP Damage)
- Bouncing Orb (% HP Damage)
- Elevation Portals (Shoots you up into the air)
- Lightning Attack - 1 hit KO
- Lotus Mele Attack (% HP Damage + Knockback)
Tips
- The hardest part of this fight is dodging Lotus's lightning attack. When it's about to happen, a random amount of platforms will crash to the floor (like debris). If you hit any of these platforms, they will disappear. Once the platforms have landed, Lotus will use a lightning attack that will one-hit KO any player who isn't positioned on the platforms. The problem is, you can be bumped off the platforms by falling debris and Lotus's melee attack.
- Using Bind in this part of the attack is a great way to do burst damage on the boss without having to deal with the lightning attack.
Lotus Stage 3 Fight
HP: 700,000,000,000
The stage 3 of Lotus is an upgraded version of stage 2. There are two new one-hit KOs to watch out for and Lotus has more HP. There is a now a new debris that falls from the sky that will one-hit KO you if you hit it. And Lotus has a new attack, which shoots out powerful energy orbs that if you get hit by will one-hit KO you. Ideally you want to get to this part of the fight with all your lives in-tact as there is a lot of randomness that can cause you quick deaths.
Attacks
- Falling Debris (% HP Damage)
- Bus Debris (1 hit KO)
- Bouncing Orb (% HP Damage)
- Lightning Attack - 1 hit KO
- Lotus Mele Attack (% HP Damage + Knockback)
- Energy Orb Attack - 1 Hit KO
Tips
- Stage 3 is very similar to stage 2, only more randomness and ways to get killed. Always keep an eye out for the falling debris at the top of your screen. Luckily, the one-hit KO bus that falls from the sky moves very slowly, so you should have plenty of time to get out of the way of it.
- The Energy Orb Attack will highlight the position on the floor before it fires, so always keep your eyes on the floor whilst trying to dodge it. This part of the fight can be PING-reliant, so sometimes even being in a safe zone can kill you due to lag.
- The lighting attack is back in this part of the fight also, so always try to get to a platform as soon as possible.
Overall, Lotus is the harder of the two bosses you need to defeat for Absolab gear. The range required to solo these bosses will vary for each class, due to other things like Boss Damage, Ignore Defence, Level and Legion Rank. There is a practise mode for this fight so if you want to learn how to do the fight, this is your best mode.
Damien Boss Fight Guide

Requirements
Level 190+
Death Count: 10
HP: 1,200,000,000,000
Damien is the easier of the two bosses in terms of mechanics and you get a healthy 10 lives to defeat him. As with Lotus, a part of up to 6 players can enter every 30 minutes and the boss can be killed once per week. There are two modes, normal and hard. This guide will be concentrating on the normal version of the boss.
The only issue with this boss is the fact that he spends a lot of the time off map and out of range, meaning you need to have a lot of DPS in order to take down this boss. There are two stages to Damien, with the second stage activating once you get Damien's health down to 30% HP. Overall a very straight forward boss fight compared to Lotus.
Attacks
- Curse System: Players may get cursed by attacks from Damien or at random. A number will appear at the top of your player's head and once the curse count hits 7 you will instantly die. You can clear the amount of curses you have by going to the summoned altar's and pressing spacebar rapidly to clear them. Once a player uses an altar it will disappear, so you're best to only use altar's when your curse count is high and close to 7.
- Flying Sword - Damien's sword will randomly fly around the map dealing % HP damage. It will at one point stop, and explode into the ground creating a periodic explosion. Anyone caught in this area will be one-hit KO'd.
- Diagonal Sword Dive - Damien will fly up into the air for 2-3 seconds, before launching himself diagonally downwards in whichever direction he was facing. Anyone caught in the dive radius will one-hit KO.
- Damiem Rush - Deals a knockback attack that can push you into one-hit KO areas. Be careful!
- Fireballs - Damien will launch into the sky and rain fireballs down upon everyone. They're quite slow and easy to dodge.
- Plumes of smoke - they deal 1-hit KO damage if you stay in them when they explode
- Lighting Strike - Orbs appear in the map and after 5 seconds they will deal a 1-hit KO to anyone directly beneath them.
- Second Phase - Orbs - These orbs will deal % HP Damage to you the longer you're in them.
- Second Phase - Fireballs - These fireballs are shot out horizontally so you have to jump to avoid them or rush to the furthest edge of the map. They are not 1 hit KO.
- Second Phase - Rush - When rushing forward, three strikes will appear and anyone caught touching them after 2 seconds will be 1-hit KO.
- Second Phase - World Tree Collapse - Puts everyone into a stuck mode where you need to spam left and right to release yourself. You must then deal 5 Billion damage otherwise everyone will get one-hit KO'd.
Tips
- Again, this is an easy boss. You just have to have enough damage to outlast all the random things that can happen. Binds are great in this boss, as it stops Damien from disappearing or going out of range.
- Try to use the summoned altars only when your curse counts get high.
- There is practise mode for this boss if you need to test the mechanics.
Absolab Coins Guide (weekly quests)
In order to create Absolab Coins and Stigma Coins, you're going to need to do the Weekly quests to obtain the materials to create them. You can obtain up to 12 of the require materials per week for each coin type and they are transferable in the account, meaning you can do these weeklies on multiple characters that are level 190+.
Scrapyard Weekly Quests
If you head to Scrapyard: Heaven and talk to One-Eye, he will give you 4 quests to complete that are randomly given from a pre-selected pool. You can exchange any of them once, so if you find a quest you recognise as being too time-consuming, you can attempt to switch it out for an easier one. You must complete all 4 quests to obtain 7 x Diffusion-Line Energy Core (Grade A). Once you have completed those 4 quests, it will unlock a bonus quest which you can complete for an additional 5 x Diffusion-Line Energy Core (Grade A).
Some quests are easier than others, so below we've made a list of the ones you want to try and avoid if you want to spend the least amount of time possible doing them:
Easy
- Scrapyard: Liberation 2 (Kill Modded Broken Android - 300) (level 202)
- Scrapyard: Repair (50 Red Android Scope - Defeat Chaseroid Red 203)
- Scrapyard: Defense 1 (kill 300 Chaseroid Red LV: )
- Skyline: Collection (Collect 50 Pipe Piece - Defeat Repairoid)
- Skyline: Delivery 1
- Skyline: Defense 2
- Haven: Patrol 2 - ( Kill 300 Repairoid Lv: 213)
- Haven: Patrol 3 (Kill 300 Outer guard EX Lv: 215)
- Haven: Collection 1
- Haven: Collection 2 (Collect 50 Red Chipset Piece - Defeat Modded Scaredroid Lv: 200)
- Haven: Collection 3 ( Collect 50 Green Chipset Piece - Defeat Modded Broken Android)
- Black Heaven Deck: Collection (Collect 2 Steel Drill - Defeat Demolishizer Lv: 215)
- Black Heaven Deck: Defense 1 (Kill 12 Salvoroid Blue Lv. 215)
- Black Heaven Deck: Defense 2 (level 213)
- Black Heaven Deck: Defense 3 (Kill 8 Demolishizer Lv. 215)
- Black Heaven Deck: Delivery 2 (Collect 2 items from Salvoroid Blue) (level 213)
- Black Heaven Inside: Delivery 1 (level 220)
- Black Heaven Inside: Collect 2 (Collect 50 Alloy ID Plate - Defeat Alloy Xenoroid EX Lv: 219)
- Black Heaven Inside: Collect 4
- Black Heaven Inside: Defense 1 (Kill Alloy Xenoroid DX - 300) (Level 219)
- Black Heaven Inside: Defense 2 (Kill Steel Xenoroid DX - 300) (Level 218)
- Black Heaven Inside: Defense 4 (Kill Alloy Xeonoroid EX - 300) (level 219)
- Black Heaven Inside: Defense 6 (Kill 300 Scrap Xenoroid EX)
- Black Heaven Inside: Defense 7 ( Kill Modded Megaroid - 12) (Level 219)
Medium
- Haven: Patrol 1 (Kill 300 Hunterizer Red Lv: 206)
- Haven Patrol 4 (level 216)
- Black Heaven Inside: Delivery 1 (Collect 50 Alloy Xenoroid Chipset - Kill Alloy Xenoroid DX)
- Black Heaven Inside: Delivery 2 (Collect 50 Steel Xenoroid Chipset - Kill Steel Xenoroid DX)
- Black Heaven Inside: Defense 3 (Kill Scrap Xenoroid DX - 300) (Level: )
- Scrapyard: Liberation 3 (Kill 300 Modded Laseroid Lv 216)
- Scrapyard: Defense 2 ( Kill 300 Chaseroid Blue Lv:208)
- Scrapyard: Defense 3 (Kill 300 Hunterizer Blue)
- Scrapyard: Delivery 1 (Collect 50 items from Hunterizer Blue) (Level 208)
- Scrapyard: Delivery 2 (Collect 50 items from Chaseroid Blue) (Level 208)
Hard
- Skyline: Defense 1 (Kill 300 modded buffroid level 214)
- Skyline: Delivery 2
- Skyline: Libreration (Kill 300 modded deliverbot - level 212)
- Black Heaven Inside: Collect 3 (Collect 50 Steel ID Plate - Defeat Steel Xenoroid EX)
Dark World Tree Weekly Quests
The Dark World Tree Weekly quests operate slightly differently. They give you 5 random quests from a pre-selected pool, which you can exchange if you don't like the look of some of them. Upon completing each quest, you get 2 x Faint Stigma Spirit Stone. If you complete all 5 quests, you also get a bonus 2 x Faint Stigma Spirit Stone for a total of 12.
Generally, the weekly quests for Dark World Tree are a lot easier. They require killing x amount of mobs or collecting X amount of items. The spawn rate in all these maps are really good, and even better with a Kanna's Kishin skill. The only thing you have to watch out for is the AFK-mobs, which will seal your ability to heal until you kill it (like Arcane River AFK mobs).
The Bottom Tier contains mobs level 210-211. The middle tier contains mobs level 212-215. The Top Tier contains mobs level 216-219.
Potential Dark World Tree Quests:
- World Tree: Bottom Tier - Eliminate Polluted Tree Saps
- World Tree: Bottom Tier - Eliminate Defiled Tree Saps
- World Tree: Bottom Tier - Eliminate Sap
- World Tree: Middle Tier - Collect Swords
- World Tree: Middle Tier - Collect Axes
- World Tree: Middle Tier - Eliminate the Swordsmen
- World Tree: Middle Tier - Eliminate the Axemen
- World Tree: Top Tier - Eliminate the Shieldmen (SLOW)
- World Tree: Top Tier - Eliminate the Wolfriders
- World Tree: Top Tier - Eliminate the Shieldbearers (SLOW)
- World Tree: Top Tier - Collect Shields (SLOW)
- World Tree: Top Tier - Collect Fangs
Conclusion
Hopefully this guide helps you with getting your Absolab gear! If you're playing normal servers, you can always just save your mesos and buy the gear from the Auction House. For Reboot players, that isn't really an option. Once you have your full set of Absolab gear, you'll probably need to make extra copies for when you start Star-Forcing (as there is a chance the items can be boomed!). I'll try to update the guide once I get to that area.


Leave A Comment