Phaser 3 HTML5 Loading Screen
Building a loading screen for your Phaser 3 game is a great way to show progress to users who are waiting to play you game. If your game contains lots of assets, audio and even videos your game's loading time is going to be quite high and thus you don't want users to be staring at a black square whilst they wait for the game to finish the preloading scene. This is where a loading screen comes in- it is a separate scene from your game, contains very minimal assets so it can load ultra-fast and gives progress updates to the user. In this tutorial we'll look at how we can create our own Phaser 3 Loading Screen.

This tutorial assumes you understand the basics of using Phaser 3 (if not, check out our Phaser 3 Beginner Tutorial to get started) and also how to separate scenes (check out our Phaser 3 Title Screen Tutorial). We'll be creating our Loading Screen into it's own scene so that we can easily separate our code and keep it compact. Let's just do a quick recap of the code we have:
game.js (the main game file that is loaded. We add all our scenes to the game from this area).
gameScene.js (the game to run. You can find the full code in our Phaser 3 Beginner Tutorial).
titleScene.js (the titleScene of the game.)
Now we will create a new scene called preloadScene.js. Let's start by simply extending the Phaser.Scene class and creating our standard methods.
class PreloadScene extends Phaser.Scene {

	constructor() {
		super({key : 'preloadScene'});
	}

	preload() {

	}

}

export default PreloadScene;
Make sure to import it into game.js:
import TitleScene from './titleScene.js';
import GameScene from './gameScene.js';
import PreloadScene from './preloadScene.js';

// Our game scene
var gameScene = new GameScene();
var titleScene = new TitleScene();
var preloadScene = new PreloadScene();


//* Game scene */
var config = {
  type: Phaser.AUTO,
  width: 800,
  height: 600,
};
var game = new Phaser.Game(config);

// load scenes
game.scene.add('preloadScene', preloadScene);
game.scene.add('titleScene', titleScene);
game.scene.add("game", gameScene);

// start title
game.scene.start('preloadScene');
Once we import it, we create the scene object preloadScene and then add the scene to the game so we can use it. We start the game by calling the preloadScene rather than the titleScene now.
For our preloadScene we just want to use the preload() function. To get a good understanding of how a Loading Screen works, we need to load lots of files into our game. If we only have one or two, the loading screen is pointless since it'll load super fast in a blink of an eye. So for the sake of this tutorial, add the following code to your preload function in preloadScene.js:
        preload() {

		this.load.image('background', 'images/tut/background.png');
		for(var i =0;i<30;i++) {
			this.load.image('background_'+i, 'images/tut/background.png');
		}

		this.load.on('progress', this.updateBar);
		this.load.on('complete', this.complete);
	}

	updateBar(percentage) {
		console.log("P:" + percentage);
	}

	complete() {
		console.log("COMPLETE!");
	}
So the first thing we do is load 30 background images into the game. This is a nice amount of data the game has to preload for us to see our loading screen in action. When creating your own game, any assets you want to load will be put into this function.
Then we add two key event listeners. These event listeners fire when certain events occur: the progress event listener calls the function updateBar() whenever the game loads some data into our game. The complete event occurs once all loading has finished.
If you run the game and open up the developer console, you should see messages in the console showing the percentage loaded and then a complete message once everything has finished.
So now we need to add some visualisation for our game players to let them know something is loading. We are going to be taking a look at Phaser 3's graphics library. First, update the Preload() function with the following code:
preload() {

		this.graphics = this.add.graphics();
		this.newGraphics = this.add.graphics();
		var progressBar = new Phaser.Geom.Rectangle(200, 200, 400, 50);
		var progressBarFill = new Phaser.Geom.Rectangle(205, 205, 290, 40);

		this.graphics.fillStyle(0xffffff, 1);
		this.graphics.fillRectShape(progressBar);

		this.newGraphics.fillStyle(0x3587e2, 1);
		this.newGraphics.fillRectShape(progressBarFill);

		var loadingText = this.add.text(250,260,"Loading: ", { fontSize: '32px', fill: '#FFF' });


		this.load.image('background', 'images/tut/background.png');
		for(var i =0;i<30;i++) {
			this.load.image('background_'+i, 'images/tut/background.png');
		}

		this.load.on('progress', this.updateBar);
		this.load.on('complete', this.complete);
	}
To create a graphics object we need to call this.add.graphics(). We can then call other methods to this object to draw us shapes, lines or anything else that the Phaser 3 Graphics library supports.
We want to create two rectangles- one of these rectangles will span 400 pixels and the other will sit on top to represent the loading rectangle. This loading rectangle will fill up as our loading percentage increases to 100.
We use the new Phaser.Geom.Rectangle(x, y, width, height); to define our rectangle's position and shape. We then add it to our graphics object by calling fillRectShape(rectangle). We also use fillStyle to color our rectangle, which takes a hexadecimal color code and an alpha value. We are using a white base for our loading bar and then a blue progress bar. Once these two rectangles have been added, we also add some text to our loading screen to tell the user we are currently loading assets.
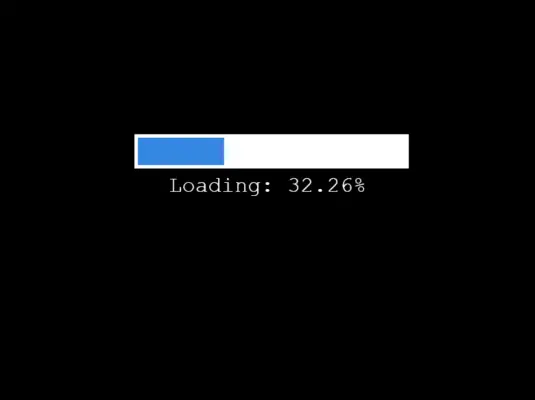
If you refresh the game in it's current state, you should now see the loading bar and text saying Loading:. Now we need to update our updateBar() function so that it increases the progress bar's width as the percentage of loading increases. We need to pass our graphics object to updateBar first, so let's modify the event listener:
this.load.on('progress', this.updateBar, {newGraphics:this.newGraphics,loadingText:loadingText});
Here we pass our newGraphics object which contains the progress bar. We also pass the loadingText object so we can update the text on the screen with the percentage.
updateBar() {
this.newGraphics.clear();
this.newGraphics.fillStyle(0x3587e2, 1);
this.newGraphics.fillRectShape(new Phaser.Geom.Rectangle(205, 205, percentage*390, 40));

percentage = percentage * 100;
this.loadingText.setText("Loading: " + percentage.toFixed(2) + "%");
console.log("P:" + percentage);

}
The first thing we do in this function is clear our progress bar graphics object. We want to set the width of our rectangle to a new value, so we need to get rid of the old one first. Then we use the same fillStyle and fillRectShape methods to add in our rectangle. We use the percentage varaible to calculate the width of our rectangle bar. For example, if the percentage value is 0.5, 0.5 * 390 will equal half the size, which is perfect for representing 50% loading.
We then update our loadingText value with the current percentage loaded. Percentage value by default is a value between 0-1. We want it to show between 0-100, so we multiply the value by 100. We also only want to show the percetange to two fixed decimal places (otherwise it would show values like 20.3482384290492349 which isn't very user-friendly), so we use toFixed(2) to do this.
Now refresh the game and you should see the loading bar slowing increase as the game loads in the assets. Perfect!
One last thing to do is to load our titleScene (the Title Screen) once all loading has been done. To do this, first modify the complete event listener to pass our scene to it:
this.load.on('complete', this.complete, {scene:this.scene});
Then modify the complete function:
complete() {
		console.log("COMPLETE!");
		this.scene.start("titleScene");
	}
Calling this.scene.start() will load our titleScene as soon as loading is finished. Congratulations, you now have your very own Loading Screen.
You should now have a good grasp on building Phaser 3 games from the ground up. We've looked at game logic, creating a title screen and now a loading screen. The next tutorial will look at bootstrapping this whole process and creating a template file to work with for any new games so you can dive right in.


Leave A Comment