Phaser 3 HTML5 Game Beginner Tutorial
In this beginner tutorial, we'll look at the Phaser 3 HTML5 framework and how you can use it to make cool HTML5 games. Phaser 3 is a HTML5 game engine/framework that can be used to make HTML5 games quick and easy. It is written in JavaScript and makes use of HTML5 canvas element to create games that can run directly in your browser without the need to download a plugin like Flash Player. HTML5 is the future of web-browser games and with Adobe dropping support for Flash in 2020, a lot of people are converting their old Flash games to HTML5.
A HTML5 game can be written entirely in JavaScript without the need of any framework to aid you. But the beauty of using a game engine like Phaser 3 is that it does all the heavy-lifting for you. The framework allows you to dive into creating games without having to worry about all the technicle setup. It comes prepackaged with tools like a Physics engine, sprite handling, audio features and so much more that it makes any HTML5 Game developer's life very easy.
So in this tutorial we are going to give you a quick overview of what Phaser is, how to use it and setup some simple HTML5 game elements. This tutorial is aimed at people who have some experience with JavaScript and are looking to start using the Phaser 3 engine to develop games.
Setting up the Phaser 3 Environment
The first thing you're going to need when coding with Phaser 3 is your own web-server area. The issue here is because Phaser 3 needs to operate over the HTTP protocol in order to have access to all the features it provides. You don't have to spend money to setup your own web-server development area. You can use WAMP, which is a pre-packaged setup that installs PHP, Apache and MySQL for you and allows you to run a web server on your localhost. You'd access games using http://localhost, which is perfect for Phaser 3 development.
Alternatively, you can buy some cheap shared-web hosting for $5/month at places like Bluehost, GoDaddy and Hostgator. That way you can share your HTML5 games with your friends. It's up to you how you wish to proceed, but you need to have your own web server setup.
Once you have your own web server setup and available, you need to download the Phaser 3 library so that we can make it available for our HTML5 games. You can download Phaser 3 here: https://phaser.io/download
For this tutorial we'll be using the simple Phaser.js library. Create a folder in your web server called Phaser and add the Phaser.js file to it.
Next we need to create our HTML5 game file. If you've used HTML before, this will look relatively easy and simple. Create a new game file called game.html, add it to the root of your web server and add the following code:
<!doctype html>
<html lang="en">
<head>
    <meta charset="UTF-8" />
    <title>My First Phaser Game</title>
    <script src="http://localhost/phaser/phaser.js"></script>
</head>
<body>
<script src="http://localhost/phaser/games/game.js"></script>
</body>
</html>
This is fairly standard HTML we have added to our game file. We setup the HTML template with the head and body tags. Notice the <script> tags for including the Phaser.js library. which now makes it available to our game. Inside the body tag we have included another script called game.js, which is where the bulk of our HTML5 game code will go. You could easily just build the game directly into this file too, but I like to separate my games into files for keeping everything separate and clean.
Phaser 3 Game Setup
Now that we have our HTML setup and have included the Phaser.js library, we now need to build our game file, which will do all the processing and logic for making the game. We'll create a new file called game.js (I have created another folder inside the Phaser folder called games. That's where my game.js file will be, but you can put it anywhere, just make sure to update the script include route).
First, copy the code below into game.js and we'll walk you through each part of it:
// Our game scene
var scene = new Phaser.Scene("game");

var config = {
	type: Phaser.AUTO,
	width: 800,
	height: 600,
	scene : scene
};

// Create the game with our config values
// this will also inject our canvas element into the HTML source
// for us
var game = new Phaser.Game(config);
The first thing we need to do for any game is create a game object. This is the focal point of our game and sets up the game settings before it is run. Before we do that, we need to create a scene that our Game can use. A scene is basically a set of functions which are called at various points during the game. We'll get more into this later but for now the code
var scene = new Phaser.Scene("game");
is basically creating a scene object and storing it in the scene variable. Next we create our config object which contains variables we can change to our liking. Type is which HTML5 rendering engine we'd like to use. We have the options of either: Canvas, WebGL or Auto. Auto uses the WebGL engine first and then fallsback to canvas if the browser doesn't support it. We then set the width and height of our game and also set the scene of the game to the scene object we just created.
This simple code won't do anything yet.
We now need to create the scene functions which are run at certain intervals. For our scene we are going to use the following functions:
- Init - this function is called as soon as the game object is created. Useful for setting up variables like lives, health, ammo etc.
- Preload - this function is called next and is used to preload content into the game. We will want to use this to preload images, audio and other elements we need for our game.
- Create - this function is loaded once Preload has finished. We use this to setup the game elements, perhaps position a character at a certain point, add text to the game or position a background.
- Update - the core function of the game. The update function is run 60 times a second (or as many as the browser can handle) and is used for game logic such as movement, interaction and scoring.
- End - this function will be called once the game is over (i.e. the player runs out of lives or the player reaches the end of the level)
Check out the Phaser 3 documentation for different scene methods we can use. The End function is our own custom scene function which is not part of the Phaser 3 API.
So let's create all of these functions for our scene variable. Add this code below the var game line:
scene.init = function() {

};

scene.preload = function() {

};

scene.create = function() {

};

scene.update = function() {

};


scene.end = function() {

};
What we are doing here is extending our scene object with functions. The scene object has already been referenced into our game object via the config, so we can now create the functions that the game expects to use. We now have some working game logic and if you load your game.html file in your browser you should see a black square. Cool huh?
Well not quite. Let's now build something that can resemble more of a game. We just want to get comfortable with Phaser 3 before jumping into anything too big. Let's add a background and a character to our game, as well as setting up some game variables. Update your game.js code to this:
scene.init = function() {
	// game variables
	this.score = 0;
	this.lives = 3;
	this.speed= 1.5;
    this.dragon_move = 1;
	this.score_text;
	this.lives_text;
};

scene.preload = function() {
	// lets preload some images that we can use in our game
	this.load.image('background', 'images/tut/background.png');
	this.load.image('player', 'images/tut/warrior.png');
	this.load.image('dragon', 'images/tut/pet_dragon_new.png');
	this.load.image('gold', 'images/tut/icon.png');
};

scene.create = function() {
   // add the background
   var bg = this.add.sprite(0, 0, 'background');
   bg.setOrigin(0,0);

   // add score text & game text to screen
   this.scoreText = this.add.text(100, 16, 'score: '+this.score, { fontSize: '32px', fill: '#000' });
   this.liveText = this.add.text(16, this.sys.game.config.height-50, 'Lives: ' + this.lives, {fontSize: '32px', fill: '#000'});

   // add player
   this.player = this.add.sprite(100, 150, 'player');
   this.player.setScale(0.3);

   // add monster
   this.dragon = this.add.sprite(350, 150, 'dragon');
   this.dragon.setScale(0.1);

   // add gold
   this.gold = this.add.sprite(650, 150, 'gold');
   this.gold.setScale(0.5);

};

scene.update = function() {

};


scene.end = function() {

};
Run the game.html in your browser and you should get something like this:
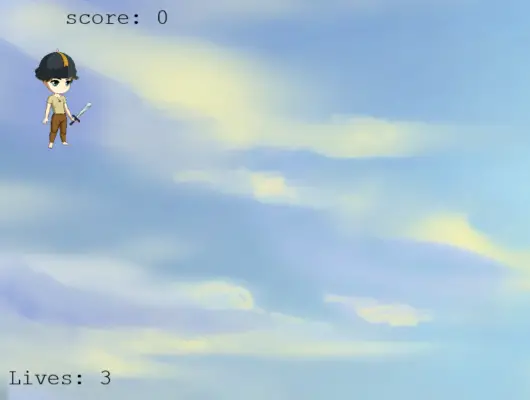
So we've got quite a few pieces to go through here. We'll start with our init function. We have defined some variables for our game using the this object. The variables for our game are lives, score and speed. We'll use these for our game logic later. The other two variables are for our text fields. The reason we set them here is because we need to access them at certain points, such as when there is a collision or we get some points for doing something.
We then preload some images into our game using the preload function. For each image we give it a name so we can reference later. We've loaded background, player, dragon and gold. The image path must be correct for the images to load. I've create a new folder called images/tuts/ in the root of the web server (next to where game.html is). Your directory setup should look something like this:
- game.html
- phaser/phaser.js
- images/tut/background.png
- images/tut/warrior.png
- images/tut/new_dragon_pet.png
- images/tut/icon.png
Once the preload function finishes loading all our images, we now need to place them into our game. We move onto the create function which is called next.
The first image we want to add is our game background. We use Phaser 3's add.sprite function.
add.sprite(X,Y, image_name);
The X and Y are coordinates for where we want to place the background. We want the background to cover our entire game, so we'll place it at 0,0. We then set the origin of the background to 0,0 too. The reason we need to set the origin of the background needs a bit of explaining:
When you add a Sprite image to the game, it is placed at its center point by default. So, if we have a picture of an apple and place it on 0,0, the middle point of our apple will be placed at 0,0. This will cause half our apple to be missing (since it's not within the game boundaries). So what we need to do is set the apple's origin to 0,0 so that it places the start of the apple at 0,0. This may sound confusing, but try adding the background without setting it's origin to 0,0 and see what you end up with.
Next we add our scoreText and livesText to the game screen. We want to show the player how many points and lives they have whilst playing and adding text objects is a great way to do this. We use the this.add.text function to add text fields to the screen:
this.add.text(X, Y, 'TEXT', { Styling Object Properties});
// add score text & game text to screen
   this.scoreText = this.add.text(100, 16, 'score: ' + this.score, { fontSize: '32px', fill: '#000' });
   this.liveText = this.add.text(16, this.sys.game.config.height-50, 'Lives: ' + this.lives, {fontSize: '32px', fill: '#000'});
We've placed our score at the top and our lives at the bottom. To get the bottom of the screen, we use this.sys.game.config.height and then take 50 pixels away from it to place the text field. We'll be updating these text fields as we progress.
Finally we add the player and monster to the screen too. The player will be controlled by us eventually. I'm using a rather large image for my player, so I want to reduce the size of it by using the setScale function and set it to 0.3 times it's original height.
// add player
   this.player = this.add.sprite(100, 150, 'player');
   this.player.setScale(0.3);
// add monster
   this.dragon = this.add.sprite(350, 150, 'dragon');
   this.dragon.setScale(0.1);
// add gold
   this.gold = this.add.sprite(650, 150, 'gold');
   this.gold.setScale(0.5);
Now let's move onto some game action and make changes to our Update function.
Phaser 3 Update Function
Our update function for Phaser 3 runs every 60 seconds to give our game a nice 60 FPS setting. This allows our game state to be interactive and animated. We are going to now add in the functionality to be able to move our character and set up boundaries so that if the player collides with the dragon, we lose a life. Update your game.js to use this update function:
scene.update = function() {

  // Is mouse click down?
  if (this.input.activePointer.isDown) {
  	// move player along the x-axis at a rate this.speed pixels
    this.player.x += this.speed;
  }

  if (Phaser.Geom.Intersects.RectangleToRectangle(this.player.getBounds(), this.dragon.getBounds())) {
    this.lives--;
  	this.liveText.setText("Lives: " + this.lives);
  	this.end();
  }

  if (Phaser.Geom.Intersects.RectangleToRectangle(this.player.getBounds(), this.gold.getBounds())) {
    this.score +=50;
  	this.scoreText.setText("Score: " + this.score);
  	this.end();
  }

};


scene.end = function() {
	if(this.lives <= 0) {
		this.scene.restart();
	} else {
		this.create();
	}
};
The first thing we want to do is move our character. We will be using the left mouse click to move our character; once it is held down we'll move the character along the x-axis slightly. We use Phaser 3's input.activePointer function, which captures the mouse click or a Touch Screen press (grat for capturing mobile/ipad touches). If the mouse click is held down, we increase this.player.x value by this.speed (which we set in the init function). Since update is run 60 times a second, we'll see the character slowly moving across the screen.
 // Is mouse click down?
  if (this.input.activePointer.isDown) {
  	// move player along the x-axis at a rate this.speed pixels
    this.player.x += this.speed;
  }
Next we need to look for collisions. To do this we need to use Phaser 3's Phaser.Geom.Intersects.RectangleToRectangle function, which will check to see if two rectangle shapes every overlap/collide based on the two sprite coordinates. There are other collision functions available in Phaser 3, but for this we'll use simple rectangle to rectangle collision.
 if (Phaser.Geom.Intersects.RectangleToRectangle(this.player.getBounds(), this.dragon.getBounds())) {
    this.lives--;
  	this.liveText.setText("Lives: " + this.lives);
  	this.end();
  }
If we hit the dragon, we'll update the game's lives and also update the text on screen to reflect that. We also call the end() function which checks to make sure we have enough lives to continue, else it restarts the game.
We've also added collision detection for our gold. We want the player to be able to hit the gold and get some points. Right now, our dragon is static and standing in our way so we're always going to hit it. We need to make our dragon move a bit. So let's add some movement for the dragon in our update function():
if(this.dragon.y >= 500) {
  	// Go up
  	this.dragon_move = -1;
  } else if(this.dragon.y <= 100) {
  	// Go down
 	 this.dragon_move = 1;
  }

  this.dragon.y += this.dragon_move;
This code basically moves our dragon up and down. The variable this.dragon_move is set in our init function. We basically say move the dragon down, once it hits the 500 pixel mark, move back up, once it hits the 100 pixel mark, move back down. We now have a moving enemy that we need to sneak past.
Once our character collides with our gold icon, we will also get 50 points and update the score text field.
A little look at our end() function before we wrap up:
scene.end = function() {
	if(this.lives <= 0) {
		this.scene.restart();
	} else {
		this.create();
	}
};
We check the amount of lives the player has to determine whether to restart the entire game. When we call this.scene.restart() we also invoke init() again, which resets our score and lives variables.
Congratulations- you've just created your first ever Phaser 3 game. Okay, this game isn't going to win any awards, but hopefully it's introduced you to the Phaser 3 library and shown you how easy it is to make HTML5 games. There are other HTML5 libraries out there that you can use if you don't like the look of Phaser 3 but you should definitely use a game library to save you a lot of the overhead work. The next tutorials we'll look at creating some classic games like Snake or Space Invaders, and also some other useful aspects of HTML5 games like pre-loading screens, Title Screen and gameover screens.
Download the full source code and images here: https://www.patchesoft.com/uploads/phase.game.zip


David Lent
Is it really necessary to setup Apache on your desktop to test your code? Can't you just open Google Chrome and do file->open file and load your html page manually? Put the html and js files all in the same directory on your machine. This is how I've been testing javaScript on my local machine for years. Am I missing something here?
Reply