PayPal API Subscription Tutorial with PHP + MYSQL
This tutorial will walk you through setting up your own subscription service using PayPal's API with PHP and MySQL. PayPal has many different systems you can use to setup a subscription service on your own website but we'll be building our system using their REST API for future-proofing.

This tutorial will walk you through the major points of setting up a PayPal Subscription service using PHP. Here are the following steps:
- Setup PayPal Developer's Account, Registering API Keys/Tokens
- Setting Up PayPal's PHP SDK
- Subscription MYSQL Table
- Cancel A Subscription PayPal PHP Code
- PayPal Sandbox To Live PHP Code
Setup PayPal Developer's Account
The first step in creating a PayPal application that uses the API is registering a developer account and generating API Keys. You'll need these keys to connect to the API and gain access to the PayPal Sandbox.
You can use an existing PayPal account to get your API Keys or create a new one. Go to the PayPal Developers area and sign up.
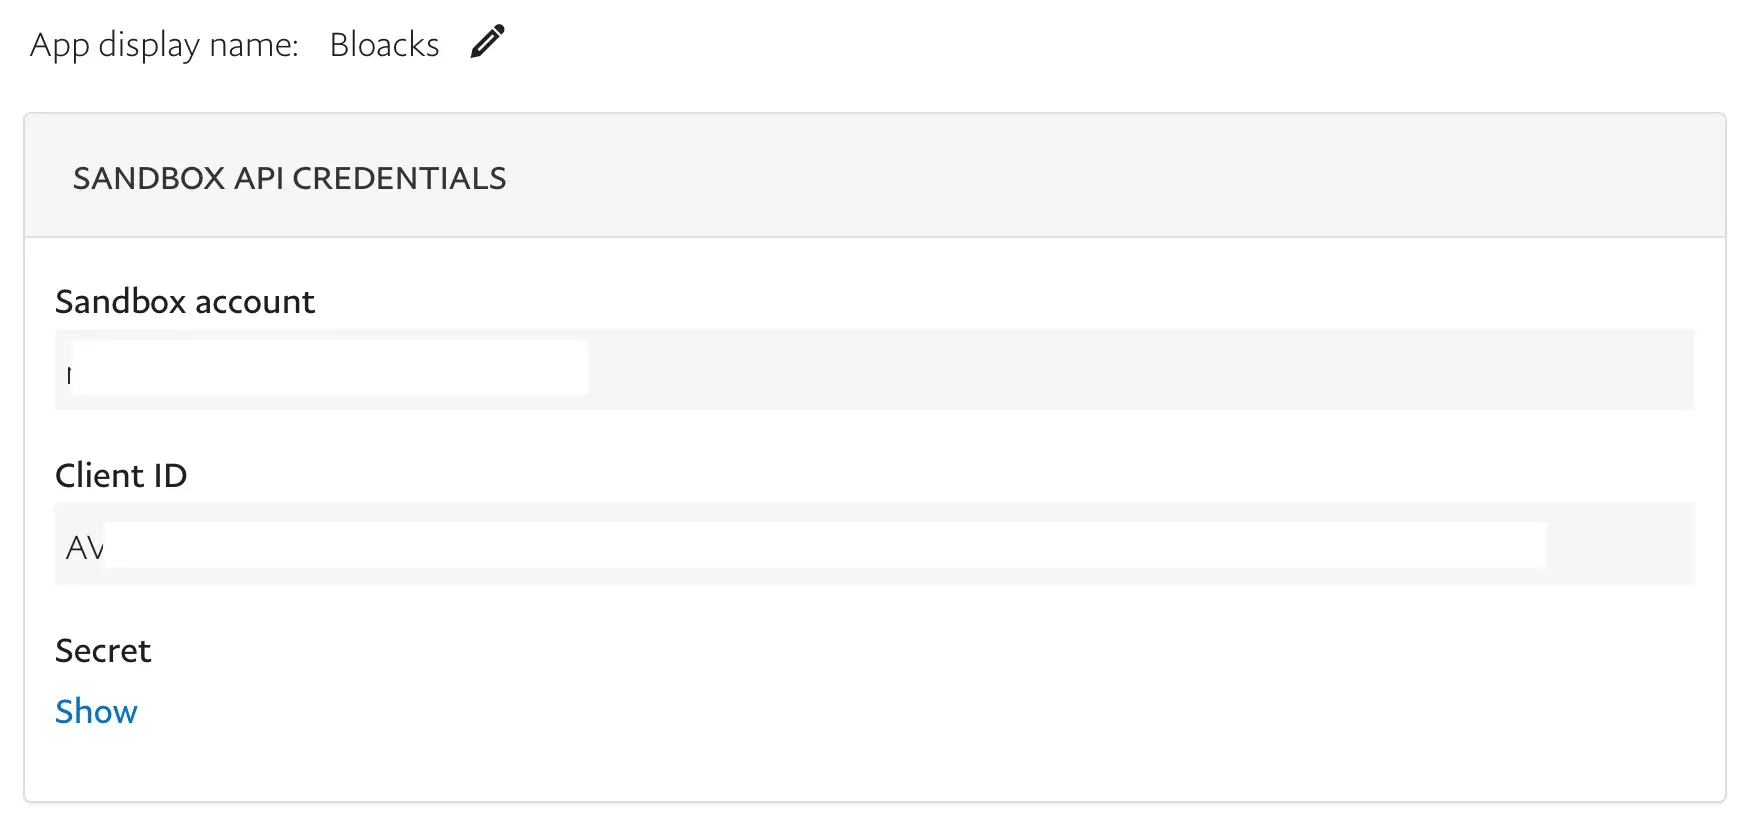
Once signed in, head over to Your Applications area. Here you will be able to see any keys you've created for either the sandbox or live version of PayPal.
The Sandbox version of PayPal is a test area for developers. It allows you to use PayPal with fake currency to test your application. It has the same interface as the live version of PayPal and also allows you to create test accounts for buying and selling.
You'll want to create a new app for the Sandbox version of PayPal first so you can test your application to make sure it works. You can easily switch your tokens to a live version later on without having to adjust your code.
Click the Create New App button and save the API keys. You'll want the Client ID and Secret for your application to work.
Setting Up PayPal PHP SDK
Now that you have your API keys, you can start coding your application!
First, download the PHP PayPal SDK from Github.
I'll be using CodeIgniter for my code base, but you should be able to use the same code for your own application by adapting it to your own framework/setup.
First you'll want to import the classes of the PayPal SDK into your code.
require APPPATH  . 'third_party/PayPal/autoload.php';

		use PayPal\Api\ChargeModel;
		use PayPal\Api\Currency;
		use PayPal\Api\MerchantPreferences;
		use PayPal\Api\PaymentDefinition;
		use PayPal\Api\Plan;
		use PayPal\Api\Patch;
		use PayPal\Api\PatchRequest;
		use PayPal\Common\PayPalModel;
		use PayPal\Api\Agreement;
		use PayPal\Api\AgreementStateDescriptor;
		use PayPal\Api\Payer;
		use PayPal\Api\PayerInfo;
		use PayPal\Api\ShippingAddress;
All these classes we are going to need for our Subscription service. If you find yourself needing other functionality, go to the PHP PayPal SDK Source Docs and you can find the class you need.
The first thing you'll want to do is have some kind of button/link that customers can click on to Subscribe. This link should direct them to the PHP process for setting up the PayPal subscription. I've created a function called subscribe() that I'll direct users to, but you might have another PHP page called process.php or something like that depending on your framework.
Some simple HTML:
<a href="mysite.com/process/">Subscribe for $4.99</a>
This url will direct our users to our process function. This is where we get into the meat of setting up the PayPal Subscription service.
Before I show you some code, it might be better to explain what we're going to need.
- Setup a Plan - The plan is basically what we are having user's subscribe to. We create this in the PayPal's API and it defines what type of subscription service.
- Payment Definition - This is how much you'll want to charge the user for the plan. You can set it to monthly, annual, pricing and other options depending on your service. I'll be doing a simple $4.99/month plan.
- Charge Model - Here you can setup extra charges for things like shipping.
- Merchant Preferences - This is where we tell PayPal what to do once the user has successfully subscribed (redirect them back to our service).
With all that in mind, let's look at the code:
$apiContext = new \PayPal\Rest\ApiContext(
  new \PayPal\Auth\OAuthTokenCredential(
    "clientid",
    "secret"
  )
);

$plan = new Plan();

$plan->setName('T-Shirt of the Month Club Plan')
    ->setDescription('Template creation.')
    ->setType('infinite')

$paymentDefinition = new PaymentDefinition();

$paymentDefinition->setName('Regular Payments')
    ->setType('REGULAR')
    ->setFrequency('Month')
    ->setFrequencyInterval("1")
    ->setAmount(new Currency(array('value' => 4.99, 'currency' => 'USD')));

$chargeModel = new ChargeModel();
$chargeModel->setType('SHIPPING')
    ->setAmount(new Currency(array('value' => 0, 'currency' => 'USD')));

$paymentDefinition->setChargeModels(array($chargeModel));

$merchantPreferences = new MerchantPreferences();
$baseUrl = getBaseUrl();

$merchantPreferences->setReturnUrl("mysite.com/subscription?success=true")
    ->setCancelUrl("mysite.com/subscription")
    ->setAutoBillAmount("yes")
    ->setInitialFailAmountAction("CONTINUE")
    ->setMaxFailAttempts("0");

$plan->setPaymentDefinitions(array($paymentDefinition));
$plan->setMerchantPreferences($merchantPreferences);
Basically what this code does is setup our $4.99/month plan and specify our pricing. The plan type is set to "INFINITE", which means it will continue to charge $4.99/month until the user cancel's it.
You can also set shipping fees if you're offering a subscription box type service where you need to send out a physical product. For this I've just set it to 0.
We then set our PaymentDefinition object, which allows us to set when we will bill. For a monthly plan we only want to charge them once a month. You can also set it to Yearly or weekly.
The MerchantPreferences contains some important details you need to be aware of. We have to code setReturnURL to contain a URL that triggers our code to check for a valid subscription. I have put a simple ?success=true variable which I can look for, but you can also just set the page to be another php process, like success.php.
The reason we need a trigger in the URL, is once the user has signed up for the subscription via PayPal's interface, we then need to activate the subscription on our side.
But before all of that, we now need to generate a Billing Agreement for our plan. In the eyes of PayPal, this all makes sense but for programmers it does seem a little confusing because we've already defined our payment details. Anyhow, I'm sure there's a reason for doing this but alas I'm not going to try and explain it.
From where we left off, we now need to define a billing agreement. First we process our plan with PayPal and create it:
try {

    $cPlan = $plan->create($apiContext);

    try {

        $patch = new Patch();

        $value = new PayPalModel('{"state":"ACTIVE"}');
        $patch->setOp('replace')
            ->setPath('/')
            ->setValue($value);

        $patchRequest = new PatchRequest();
        $patchRequest->addPatch($patch);

        $cPlan->update($patchRequest, $apiContext);
        $cPlan = Plan::get($cPlan->getId(), $apiContext);

    } catch (Exception $ex) {
        echo "Failed to get activate";
        var_dump($ex);
        exit();
    }

} catch (Exception $ex) {
    echo "Failed to get activate";
    var_dump($ex);
    exit();
}
This is how PayPal allows you to setup your plan. It's called Patch The Transaction and is quite confusing.
Once your plan is created, you move onto the BillingAgreement and then directing your user to PayPal's site for payment.
$agreement = new Agreement();

$agreement->setName('Base Agreement')
    ->setDescription('Basic Agreement')
    ->setStartDate('2019-06-17T9:45:04Z');

$plan = new Plan();

$plan->setId($cPlan->getId());
$agreement->setPlan($plan);

$payer = new Payer();
$payer->setPaymentMethod('paypal');
$agreement->setPayer($payer);

$shippingAddress = new ShippingAddress();
$shippingAddress->setLine1('111 First Street')
    ->setCity('Saratoga')
    ->setState('CA')
    ->setPostalCode('95070')
    ->setCountryCode('US');

$agreement->setShippingAddress($shippingAddress);

try {
    $agreement = $agreement->create($apiContext);

    $approvalUrl = $agreement->getApprovalLink();

} catch (Exception $ex) {
    echo "Failed to get activate";
    var_dump($ex);
    exit();
}

header("Location:" . $approvalUrl);
exit();
The BillingAgreement tells PayPal when to start charging our user. The Time format must be ISO 8601 date i.e. "2019-06-17T9:45:04Z"; and luckily PHP's date function has a built-in operator for that 'c' so you can add the current date using date("c").
Once you've setup the agreement, you redirect the user to the ApprovalURL, which is PayPal's payment gateway where the user confirms the subscription. Once they've confirmed, they are redirected back to our site based on the setReturnURL.
If you remember we put a ?success=true variable in our return URL. Well, we can look out for that in our code to then activate the user's subscription.
if (!empty($_GET['success'])) {
    $token = $_GET['token'];
    $agreement = new \PayPal\Api\Agreement();

    try {
        $agreement->execute($token, $apiContext);
    } catch (Exception $ex) {
        echo "Failed to get activate";
        var_dump($ex);
        exit();
    }

    $agreement = Agreement::get($agreement->getId(), $apiContext);
    $details = $agreement->getAgreementDetails();
    $payer = $agreement->getPayer();
    $payerInfo = $payer->getPayerInfo();
    $plan = $agreement->getPlan();
    $payment = $plan->getPaymentDefinitions()[0];
}
And there you have it. You have successfully activated your first user subscription. Now, this code isn't very useful without storing information in a MYSQL database to manage your subscriptions. You'll want to offer functionality like showing a user's subscription to them, allowing them to cancel it and possibly a history of transactions.
It can get complicated in this part mainly because a user can also cancel their subscription directly from the PayPal website. That's why you need to be constantly checking your user's subscriptions to make sure they're still in an Active state.
Subscription MYSQL Table
When storing your user's subscriptions, you'll want a table that identifies the user account on your system and also the subscription ID that refers to their PayPal Subscription. The Subscription ID allows you to lookup their subscription via PayPal's API whenever you like.
user_subscriptions:
ID (int) (primary key), userid (INT), agreementid (VARCHAR), paypal_email (VARCHAR), timestamp (INT)
To lookup a user's subscription using the API:
$agreement = Agreement::get("AGREEMENTIDHERE", $apiContext);

$details = $agreement->getAgreementDetails();
$payer = $agreement->getPayer();
$payerInfo = $payer->getPayerInfo();
$plan = $agreement->getPlan();
$payment = $plan->getPaymentDefinitions()[0];
Then you have access to all the data you need about your user's subscription. For example, if you want to get the PayPal email address of your payer, you can do:
$payerInfo->getEmail();
To see what information you have available, see the Source Documentation.
If you want to verify that a user has an active subscription, you can check the Agreement's state like so:
$agreement = \PayPal\Api\Agreement::get("Agreementidhere", $apiContext);
$state = $agreement->getState();
if($state != "Active") {
// Not active
// they either cancelled or payment failed
}
You could run a cron to check all your user subscriptions from time to time to make sure they are all active, or check them on the actual page of your site each time it's loaded. Just remember that each time you connect to the PayPal API it has a slight delay.
Cancel A Subscription PayPal PHP
It's easy to allow a user to cancel their subscription once you have stored their agreementid. The code below shows how it's done:
$apiContext = new \PayPal\Rest\ApiContext(
    new \PayPal\Auth\OAuthTokenCredential(
        $this->clientid,
        $this->secret
    )
);

$agreementId = "Your agreementid here";
$agreement = new Agreement();
$agreement->setId($agreementId);

$agreementStateDescriptor = new AgreementStateDescriptor();
$agreementStateDescriptor->setNote("Cancel the agreement");

try {

    $agreement = Agreement::get($agreement->getId(), $apiContext);
    $details = $agreement->getAgreementDetails();
    $payer = $agreement->getPayer();
    $payerInfo = $payer->getPayerInfo();
    $plan = $agreement->getPlan();
    $payment = $plan->getPaymentDefinitions()[0];

    $agreement->cancel($agreementStateDescriptor, $apiContext);
} catch (Exception $ex) {
    echo "Failed to get activate";
    var_dump($ex);
    exit();
}
Once cancelled the subscription will no longer continue billing the user. You may want to add some extra code to figure out how long left the user has on their subscription from the point of cancelling it so that they are not wasting those days.
PayPal Sandbox To Live PHP
There is a simple way to change from the PayPal Sandbox to the live version of PayPal's API. First you need to create a set of Live API keys and replace those ones in your application. Then you just need to set the APIContext Object's config to use the live version. You can do that like so:
$apiContext = new \PayPal\Rest\ApiContext(
		  new \PayPal\Auth\OAuthTokenCredential(
		    $this->clientid,
		    $this->secret
		  )
		);

		$apiContext->setConfig(
		      array(
		        'mode' => 'live'
		      )
		);
If you want some more good examples of PHP Code for PayPal's API, I recommend checking out the PayPal PHP Wiki Examples. Here you can get more examples for single payments and other types of transactions.
Feel free to post any comments you might have below!


Leave A Comment