Learn Linux: Setup DNS Server with Bind On Debian
This guide will teach you the basics of DNS (Domain Name System) and how to setup your own DNS server so that your domain names point to your website.
DNS in it's basic form is the process of converting domain names to IP addresses. Whenever you type in a domain address (like www.google.com) in your web browser, DNS is used to convert that domain name into an IP address. Once you have the IP address you can access the web server and be served content.
On Linux, the most common DNS server is BIND, so let's get started with setting it up so that our domain names can be reached!
For this guide we'll be using Debian, but you can easily use Bind on most other versions of Linux like Ubuntu.
Step 1 - Installation
Like with most Linux packages, it's very simple to install Bind. Simply use the apt-get to grab the bind9 package:
apt-get install bind9
You may also want the bind utilities package which contains the DIG package. The DIG command allows you to test that your DNS setup is working correctly. Go ahead and install it by using:
apt-get install bind9utils
Step 2 - Defining Zone Files
A Zone file is basically just the DNS configuration for a domain name. Each domain has it's own zone file. It's a simple text file that tells our DNS server what IP addresses to match to the domain name. In order to do this, our Zone file needs to contain "records". There are several types of records that we use in our zone files, here is a table of the most common types:
| Type | Name | Description |
|---|---|---|
| SOA | Start Of Authority | This record must exist for every zone file. It's used to define the basic settings for each domain, including TTL (time to live), refresh rate, domain name, contact email and more. |
| NS | Name Server | A record of the authoritative name servers for the domain. |
| A | Host | A host record describes the IP address that is used for a host name. |
| MX | Mail Exchange | A mail exchanger record is used for email servers. It tells the email server where to send emails being sent and received from your email address. |
| CNAME | Canonical Name | Used for aliases of hosts. |
| PTR | Pointer | A PTR record can be used in reverse dns lookup (basically mapping an IP address to a domain name) |
| TXT | Text | Can be used to contain any information. Not really needed or used nowadays. |
In order to create a zone file, we first must update the bind9 configuration file to define our new zone. For this example, if our data is:
Domain: http://www.example.com/
IP: 192.34.101.38
We need to modify the bind9 configuration file:
nano /etc/bind/named.conf.local
Add our new zone for our domain:
zone "example.com" {
     type master;
     file "/etc/bind/zones/example.com";
};
Notice the file directive which points to our to-be-created zone file, which we will do in just a sec.
We also want to add in a reverse dns zone. A reverse dns zone is used for when we want to map our IP address to our domain name. It's mostly used by a DNS client looking to resolve our IP address. Let's define another zone for our reserve dns zone:
zone "101.34.192.in-appr.arpa" {
     type master;
     file "/etc/bind/zones/reverse/rev.101.34.192";
};
Before we move on, let's describe a few things about this reverse dns zone.
Unlike the name of our first zone, the name of the reverse dns zone must contain our IP address reversed with the host digit removed and appending in-appr.arpa. So 192.34.101.38 becomes 101.34.192.in-appr.arpa. The reason we remove the host digit is because we use this part in our zone file later.
What is in-appr.arpa? It is simply the authority which is used to map reverse dns IP addresses to domain name systems.
So now that we have defined our zones, it's time to make those zone files (we defined these with the file directive in the zone definitions above).
Step 3 - Creating Zone Files
A zone file is simply another text file that BIND reads. You define the name and location of the zone files in the main bind configuration file. If we're using the example data from our previous section, then we need to create two zone files. One for our forward zone and one for the reserve lookup zone.
Reminder: Remember, we named our zone file locations in the named.conf.local file. Check above!
Let's create an empty text file first for our forward domain zone:
touch /etc/bind/zones/example.com
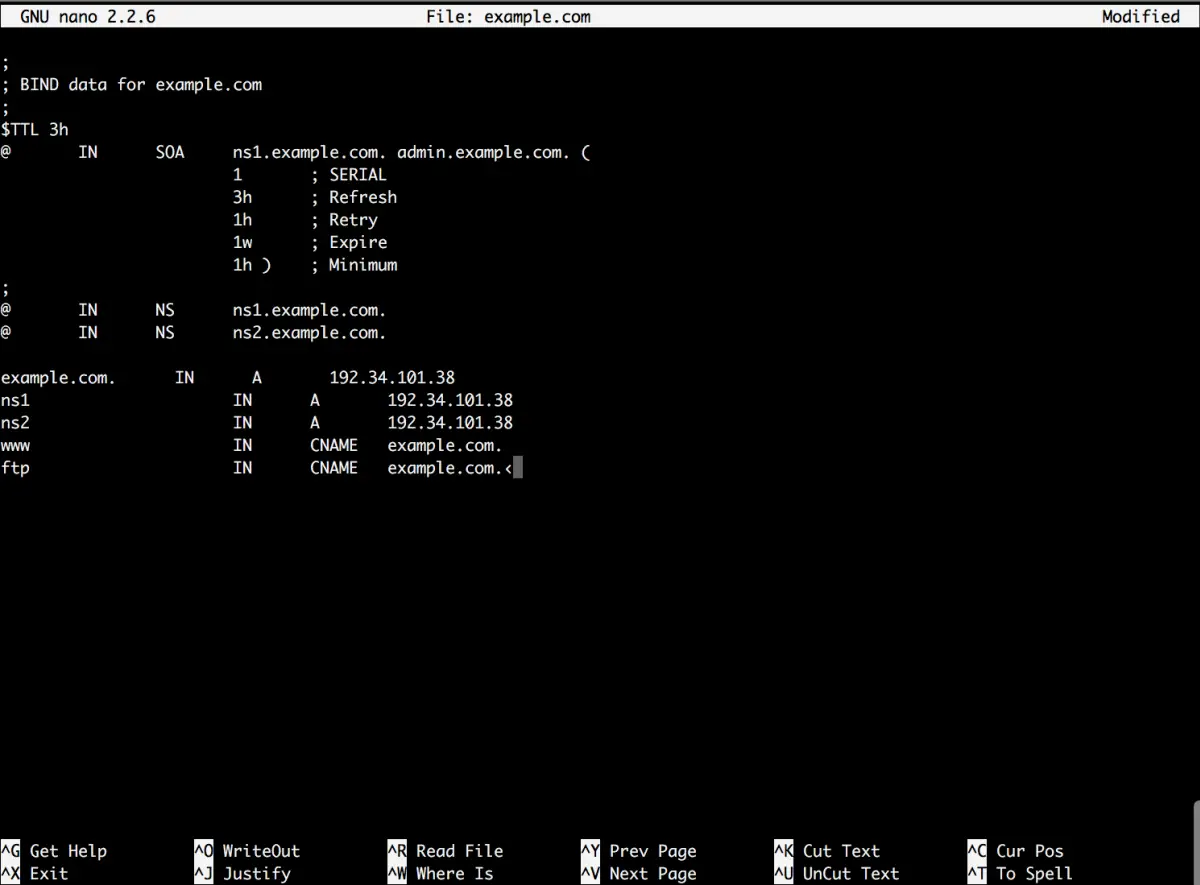
Now add the following zone text:
;
; BIND data for example.com
;
$TTL 3h
@       IN      SOA     ns1.example.com. admin.example.com. (
                        1       ; SERIAL
                        3h      ; Refresh
                        1h      ; Retry
                        1w      ; Expire
                        1h )    ; Minimum
;
@       IN      NS      ns1.example.com.
@       IN      NS      ns2.example.com.

example.com.      IN      A       192.34.101.38
ns1                     IN      A       192.34.101.38
ns2                     IN      A       192.34.101.38
www                     IN      CNAME   example.com.
ftp                     IN      CNAME   example.com.
Now there is a lot of information here to take in, so let's break it down.
First, data that follows a ; is a comment. We have started the file by making three comment lines, just to remind us what the zone file is and for which domain.
The $TTL 3h line tells us the time-to-live value. This value basically tells DNS to store this information on our domain for a certain period of time. Once that time expires, it attempts to fetch the zone file information again by reading our file. Why? It saves resources than having to lookup our zone file all the time.
Remember when we talked about records? Well for a zone file to work, it must have a SOA record, which is a Start of Authority record.
@ IN SOA ns1.example.com. admin.example.com. (
The @ symbol is telling us the origin of the zone, referring to the name of the zone which we specified when defining our zones in our config. The IN refers to Internet Record and the type of record is SOA. Next we define the primary DNS server for the zone, in this case its ns1.example.com. (make sure to add the extra dot at the end .) The admin.example.com is actually an email address, used as the contact for the zone but the @ is replaced with a .
Next we define some variables for our SOA inside the opening and closing brackets.
1       ; SERIAL
                        3h      ; Refresh
                        1h      ; Retry
                        1w      ; Expire
                        1h )    ; Minimum
Remember that ; is just a comment to remind us of what these values are. The first is labelled Serial, which is just a number to define the version of the zone file. We need to increment this every time we make a change to the file to make sure bind takes the changes into affect. Next we have Retry, Expire and Mimimum. All of these relate to how bind updates the zone files and how DNS fetches the data, representing time-to-live values.
After that we create two NS records (nameserver).
@       IN      NS      ns1.example.com.
@       IN      NS      ns2.example.com.
ns1.example.com and ns2.example.com will be our domain name's custom nameserver records. Our primary NS record ns1 is defined here but so is our secondary ns2 record. This is used incase a DNS system has troubled resolving ns1, we have ns2 as a backup.
After that we create our A records.
example.com.      IN      A       192.34.101.38
ns1                     IN      A       192.34.101.38
ns2                     IN      A       192.34.101.38
An A record is an authorative record which defines the IP address to lookup when we point attempt to use our domain name. First we have defined our domain name and then our two nameservers. Now when we update our domain name at our registrar with our nameservers ns1.example.com and ns2.example.com, DNS will lookup the IP address 192.34.101.38, which will then resolve our domain name example.com.
Next we add in our CNAMEs:
www                     IN      CNAME   example.com.
ftp                     IN      CNAME   example.com.
Now when a user can access http://example.com and http://www.example.com and it will point to the same IP. A CNAME record is basically an alias, and our alias points to the A record example.com. We've also added in ftp for good measure, ftp.example.com also resolves to our IP address.
Step 4 - Reverse Zone File
Now we need to make the reverse zone file for our domain. Let's create the file we defined in the main bind configuration file using touch:
touch /etc/bind/zones/reverse/rev.101.34.192
Add the following text into our reverse file rev.101.34.192:
;
; BIND reverse file for 101.34.192.in-addr.arpa
;
$TTL    604800
@       IN      SOA     ns1.example.com. admin.example.com. (
                                1       ; Serial
                                3h      ; Refresh
                                1h      ; Retry
                                1w      ; Expire
                                1h )    ; Minimum
;
@       IN      NS      ns1.example.com.
@       IN      NS      ns2.example.com.

38      IN      PTR     example.com.
The reverse zone file is very similar to our forward zone file. We add our comments to remind us about what type of file it is and then define the time to live. The TTL can either be a number in seconds or you can use the following notation 1h,1d, 1w (1 day, 1 hour and 1 week).
As stated, all zone files must start with a SOA record. We define our reverse lookup zone file in the same way as our forward: the primary nameserver followed by the contact email (with the @ symbol replaced with a dot).
As before, we also define our two nameserver records next.
The only different line in this file is our PTR record.
38 IN PTR example.com.
38 refers to the host octet in our IP address. Remember we used 192.34.101.38 as our IP address and to reversed it to 101.34.192.in-addr.arpa. Now we need to specify the host octet of our IP address so that in-addr.arpa knows which digit to assign when it reverse looks up our address.
Save your zone files and let's run some tests!
Step 5 - Final Configurations
We need to make sure our configuration changes are correct and that the syntax is valid. We can do that by using named-checkconf command:
named-checkconf /etc/bind/named.conf.local
Remember, that each time you make changes to your bind configuration files, you'll need to restart the bind9 daemon. To do that, just run:
service bind9 restart
or
/etc/init.d/bind9 restart
The first thing you'll want to do is add your new nameservers to your domain name. In our example, we had a domain name example.com with the nameservers:
ns1.example.com - 192.34.101.38
ns2.example.com - 192.34.101.38
So, using our domain registrar, we need to add new custom nameservers and assign them to our domain. This process differs from registrar to registrar, but you can find some useful guides on how to set these up by googling.
- Namecheap: https://www.namecheap.com/support/knowledgebase/article.aspx/767/10/how-can-i-change-the-nameservers-for-my-domain
- Godaddy: https://uk.godaddy.com/help/set-custom-nameservers-for-domains-registered-with-godaddy-12317
Step 6 - Testing
Once you have setup your domain name with custom nameservers, it's time to test to see it working. The most obvious test is to just enter your domain name into your web browser and see if it is pulling up your website page.
However, sometimes it can take a little time for the DNS to update or clear old cached files. Another method of testing is to use the dns utility DIG.
The DIG command allows us to lookup the dns of a domain and show us the records it retrieves when doing so, as well as any errors it may find. Let's run an example:
DIG google.com
You should see something like:
; <<>> DiG 9.9.5-9+deb8u6-Debian <<>> google.com
;; global options: +cmd
;; Got answer:
;; ->>HEADER<<- opcode: QUERY, status: NOERROR, id: 37398
;; flags: qr rd ra; QUERY: 1, ANSWER: 1, AUTHORITY: 0, ADDITIONAL: 1

;; OPT PSEUDOSECTION:
; EDNS: version: 0, flags:; udp: 512
;; QUESTION SECTION:
;google.com.            IN    A

;; ANSWER SECTION:
google.com.        299    IN    A    216.58.213.174

;; Query time: 12 msec
;; SERVER: 8.8.8.8#53(8.8.8.8)
;; WHEN: Tue Jul 26 17:32:43 EDT 2016
;; MSG SIZE  rcvd: 55
You can clearly see the A record returns the correct IP address for the server. When you dig your own domain name, make sure it returns your server's IP address. That way you'll know you've set it up right.
Conclusion
This is a quick overlook into the world of DNS. If you really want to understand the concept of DNS and try to understand how it all fits together, I recommend doing a bit of light reading. Some books include:
Resources
- http://computer.howstuffworks.com/dns.htm
- https://wiki.debian.org/Bind9
- https://en.wikipedia.org/wiki/Domain_Name_System


Leave A Comment